Posts I Like

What tattoo do you want, and where would you put it?
Well, I already have several tattoos on my arms and my leg. I’m not going to say what they are, however, because I think that some things should be a mystery.


Vintage Craftsman tool pouch cleanup part 2: The Stenchpire Strikes Back.
So my attempts at cleaning and restoring a vintage Craftsman tool pouch had a bit of a setback today.
For those of you who might be unaware, over the Christmas holidays I discovered an old tool pouch that once belonged to my step dad in my mom’s basement. The pouch had a smell that I will call “unique”, a mixture of used oil, mildew, must, tobacco, and old, funky leather. An initial cleaning with saddle soap, while improving the outward appearance of the pouch, actually intensified the smell. So for the past few days I hung the pouch outside for at least ten hours, bringing it inside at night and spraying the pouch with an enzyme based boot cleaner. Today after work, and after the pouch spent almost 11 hours outside in the fresh air, I was happy to discover that the smell was virtually non existent….or so I thought.
Below is an unedited video that was filmed just a few hours ago. I decided to give the pouch another cleaning with saddle soap before conditioning the leather. Let’s say that the smell isn’t through with me just yet….
Vintage Craftsman Tool Pouch Restoration.
Before I get started, I would like to wish the 30 people out there who still read woodworking blogs a Happy New Year! I’ve always felt that the New Year, as a holiday occasion, is overrated, but that is another matter entirely. Regardless, I have no major furniture making projects planned for the next few months, but I have been in the midst of several home renovation/carpentry projects. While it is unlikely that I will write about these projects (unless I come across something worth noting), I will be busy, nonetheless.
In any event, what I wanted to write about today is a minor but perhaps overlooked area of restoration: tool pouches.
For those of you who have been reading this blog on a somewhat regular basis, you might be aware that nearly two years ago my step-father, Jack, passed away. He spent most of his adult life as a packaging mechanic and maintenance person, and he accumulated a very large collection of tools over the course of his life. For more than a year I have been helping my mom go through these tools in my spare time, and last year I detailed on the blog and in videos the restoration of two of his smaller tool boxes. Just when I thought we were finished, during the Christmas break we discovered yet another bin of tools. Thankfully in this case there weren’t too many and we were able to quickly pass the tools onto new homes. But there was one item in the bin that I decided to keep, and that was a small, vintage Craftsman leather tool pouch.
Jack had a half-dozen or so pouches of similar size, and all were filled with an assortment of wrenches, Allen keys, and screw drivers. I am guessing that he had these small pouches filled with the specific tools needed for the basic maintenance of specific machines. Rather than lug a heavy tool box to each machine, it seems that he set up a series of small pouches that he could just grab and go whenever one of the packaging machines needed a quick tune up, with each pouch corresponding to a respective machine, or a specific aspect of said machine….time is money in the production world. I discovered most of the pouches last year, so I brought them home along with their tools and cleaned them. Most of these pouches were made of Cordura (I think that is the correct name of the material), but the Craftsman pouch is vintage and made of leather, so I decided that it might be interesting to see if I can really clean it up and get it looking like new again.
First things first, I did not take a true “before” photo of it. When I brought it home the pouch was quite filthy and smelled awful…a combination of must, old machine oil, mildew, all held together with a faint but definitely distinguishable layer of tobacco odor, which makes sense as he spent several years working for a company that packaged cigars. The smell was so bad that immediately I emptied the pouch, vacuumed it, wiped it down with some soapy water, and hung it outside in the frigid temperatures to air out…yeah…it smelled that bad.
The initial cleaning did little to alleviate the smell, so I poured some baking soda into a coffee filter, bound it with a rubber band, and shoved it into the pouch. For good measure, I also stuffed the pouch with around a dozen tea bags, including the front pockets and the belt loop. As far as using teabags to remove odors from leather, I’ve seen some recommend steeping the bags in boiling water and letting them dry before using them; others recommend using them dry, and some recommend lightly misting the bags before inserting them. In this case, I decided to lightly mist the bags that I placed inside the main pouch, while leaving the bags dry in the smaller areas. After a few days of brewing the smell of the pouch improved, though it didn’t disappear.
The next step was cleaning the pouch with a lather of saddle soap (which you will see me do in the video link below). This cleaning removed years of grime…..and it also brought back the smell with a vengeance. As is often the case, the deeper cleaning revealed just how dirty the pouch was, and while its outward appearance has improved a great deal, it smelled just as bad as it did when I brought it home. So rather than having this tiny pouch with its disproportionately sized odor stink up my garage, I once again stuffed it full of tea bags and baking soda and hung it outside to air out. To help, I also sprayed it with an enzyme based boot cleaner. Generally speaking, a good idea in cases like this is hanging the pouch in warm, indirect sunlight for a few hours, but because it’s January and the average temperatures are generally barely above freezing, warm sunlight isn’t an option for the time being. Adding tea tree oil to the baking soda “tea bag” is also an option, but as of writing the post I haven’t tried it yet.
While the tool pouch was “brewing” I placed most of the tools that were inside it in a bath of water and citric acid. Many of the tools were rusty, grimy, or a bit of both. A few of the smaller wrenches were relatively clean, so I only gave them a scrubbing with steel wool and 3 in 1 oil, and that improved their look and feel considerably. Once the rusty tools were finished soaking in the citric acid bath they also received the 3 in 1 treatment, after which I polished them using a fine wire brush attachment on the drill press, and they look much better for it.
I cannot find any real information regarding exactly when Craftsman sold this particular model 9 40463, but I would guess that it was during the 1990s, but it may very well be older. The pouch leather, awful smell aside, appears to otherwise be in fairly good condition. There was also a swivel snap hook, that I initially thought was a part of the pouch, but it turns out that Jack added it “after-market”, by punching a hole in one of the screwdriver slots. For the record, I don’t care for modifications such as this because they will eventually tear and degrade the leather. Luckily I have a small leather repair kit, and if I can get rid of the bad smell I will attempt a repair.
When I brought home this tool pouch I thought the restoration was going to be a simple matter of good old-fashioned elbow grease and patience; this has not turned out to be the case. I can sincerely say that I don’t know if I will be able to get this pouch back to usable condition. Lord knows how long it was sitting in a dank corner of the basement, and the odor may be too ingrained to remove. It may seem strange to put so much time and effort into restoring a tiny tool pouch, especially when considering that I have a newer one that is almost identical to it. But it does have sentimental value in that it not only belonged to Jack, but I also had a similar pouch “back in the day”.
Regardless of sentiment, I also firmly believe that a real craftsman takes care of his tools. I’m not of the mindset that tools and their storage mediums should be abused. Some tradesmen feel a kind of shame when their tools and pouches appear to be too “new”, but I was never one of them. Wear and tear is one thing, as they are a sign of a tool that is being used, but dirt and grime are another. A professional looks like a professional, and that means a tool kit that is clean and well maintained.
The Slightly Confused Gift List 2023
We have once again come to the time of year when I, along with the three remaining woodworking bloggers, offer a few recommendations for Christmas gifts for the home woodworker and/or DIYer. As per usual with my lists, everything on it is something that I currently own and use. Because this year I have cut back on my woodworking (no point in making furniture that you don’t need), my list will be shorter than normal.
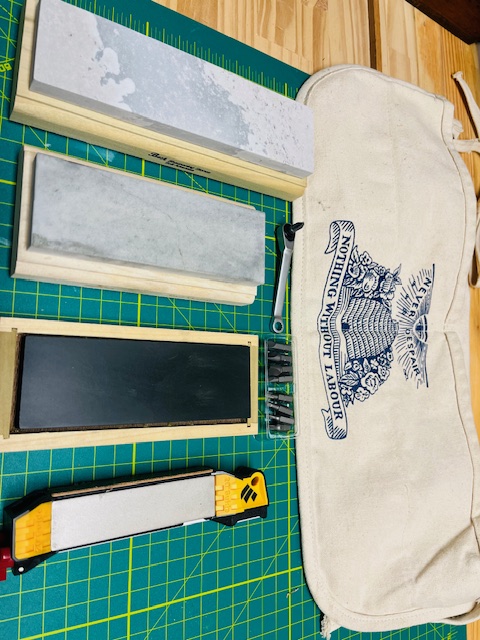
The first item on my list is Arkansas Sharpening Stones from Best Sharpening Stones…bestsharpeningstones.com.
I have been using these stones for a year now and I have been very impressed with their quality and affordability. I personally use a (8″ x 2″) soft stone, a (6″ x 2″) hard stone, and a (6″x2″) black (surgical) stone as the main medium for sharpening knives and most chisels. The cost I paid for these stones, respectively, was $14.95, $15.95, and $52.95. Even better…Best is currently offering a three-piece kit of the 8″ x 2″ soft, hard, black stones at a cost of $58.95.
The soft and hard stones that I use are wood mounted, and thus less expensive because they have only been factory lapped on one side. As of writing this post, Best is offering the wood mounted Black (surgical) stone for $39.95. I personally prefer the wood-mounted stones as I find them easier to use in their stands. And, if you want all three stones, purchasing the kit mentioned in the above paragraph is the way to go.
*** I do feel the need to add one caveat. The last two times I ordered from Best I chose the USPS shipping option, as it was the least expensive option and I was not in a rush. Speaking as a person who has ordered thousands of parts in my lifetime, if not tens of thousands, I can tell you from a great deal of experience that the USPS and the month of December do not always mesh well. If you are considering ordering one or more of these stones as a Christmas gift, and if you need it quickly, I would highly recommend choosing UPS as your shipping option ***
The second item on my list is the Work Sharp Guided Field Sharpener.
I picked up one of these sharpeners last spring because I was tired of my pocket knives being dull at inopportune moments, and it has not disappointed. The sharpener consists of two diamond plates (coarse and fine), a ceramic rod, a leather strop, and angled guides (20 deg for the diamond plates, 25 deg for the strop). There is also a small ceramic rod for honing serrations. The dimensions of the sharpener are 6 ½ inches long, 1 ¼ inches wide, and 1 inch deep, making it nearly perfect for carrying in a small tool bag, your tool apron, or even your jacket pocket. The diamond plates and the strop are replaceable. For my part, I replaced the coarse plate with a second fine plate, because the coarse plate seems to be for very rough grinding, and all of my pocket knives are reasonably well kept. It takes a less than 5 minutes to put a very nice edge on most typical pocket knives. While I don’t think this sharpener will get a sushi knife sharpened to razor keen, it will without a doubt keep a pocket knife more than sharp enough for every day use.
I’ve also discovered that the angled guides are a bit more useful than they might seem. After using the sharpener just a few times it became second nature to use the guides, and they also became something of muscle memory aid. I ordered sharpener from Amazon at a total cost of $30.66. It looks like they are currently selling for $34.95, which I feel is still a real bargain for a handy tool that does a very nice job in keeping your pocket knives sharp and ready to use.
The third item on my list is the Lost Art Press Tool Apron.
If I remember correctly, this item was an addendum on last year’s gift guide, but I feel it is worth adding to the main list this year. I received mine as a birthday present in 2022, and I’ve found it to be very useful not just while woodworking, but for use on any general home improvement projects. The (two) pockets seem to be at the optimal depth to keep things from spilling out, but not so deep that stuff is difficult to retrieve. I also like that though the apron is beefy and very well constructed, it is also very lightweight and doesn’t interfere with movement, such as climbing a ladder, etc, like a traditional leather tool belt might do. If I am not mistaken, these aprons have a current cost of $50 on the LAP website.
The last item on my list is a Craftsman Ratcheting Offset Multi-Bit Screwdriver.
When I was a press operator twenty years ago, I often used one of these mini ratcheting screwdrivers to tighten up the pull collars on the press because too many times they were in a position that was too tight for hands holding a regular sized screwdriver. I left that job back in 2004 when the company shut down, and the tool has since disappeared along with the job. I came across one last winter at a big box store and purchased it on a nostalgic whim. Sure enough, it soon came in handy when hanging a bathroom vanity cabinet. And, I was able to use it to tighten the hinges on a hanging spice cabinet in a spot where it was awkward to use a screwdriver without taking down the cabinet. While this tool isn’t going to torque down anything heavy, it does well in tight spots (like the hanging the aforementioned medicine cabinet) when there are no other options. And, while I haven’t tried it yet, I would bet that it does well on very small hinges.
The kit includes the ratchet and an assortment of nine, ¼ inch bits. Cost, if I remember correctly, was around $16 including sales tax. The tool did not include a case, but I do believe that there is a slightly more costly version of the kit available that does include one, which I would have purchased had it been on the rack at the store.
So there you have it. The Slightly Confused Christmas list of 2023. While I usually refrain from adding website addresses or links to my posts, because in the past people have gotten weird about it, in this case I made an exception for the Best Sharpening Stones website when I discovered that just entering the words “Best Arkansas Stones” on a search engine may or may not lead you to the company website. Otherwise, I will add…as usual…that I feel safe in recommending any and all of the items on this list.
So from mine to yours I would like to wish you all a very happy and safe Christmas and holiday season.
Sorry that the photo is vertical…wordpress is not cooperating.
Rule # 9
I can say with honesty that I am not a big watcher of network television. I have nothing against television, per se, it’s just that during a normal work week, by the time I get home, take care of the occasional chores, have dinner, and settle in, it is starting to get late and I am starting to get tired. This is usually the point in the evening when I will read a little bit, because reading, more than anything else, seems to help me relax and fall to sleep, which is what I’m looking to do some time by 11pm. But, this isn’t to say that we never watch TV at the house, and for the past few months NCIS has been our go-to nighttime show to watch.
I enjoy the show, probably because I can relate to the main character, Agent Gibbs. He’s stoic, doesn’t enjoy extraneous conversation, he enjoys woodworking as a hobby, and he always carries a pocket knife. And before I go on I have to add that Agent Gibbs’ workshop is probably one of the more realistic depictions of a home workshop (of a serious hobbyist) that I’ve ever seen in media. It’s in a basement…the lighting isn’t all that great…it’s pretty messy…and the tools, while loosely organized, are not gleamingly bright and neatly arranged on wall racks that would likely be found in a high end woodworking store. As a home hobbyist myself, I appreciate this attention to detail.
But, what I wanted to talk about was Gibbs’ rule #9: Always carry a knife.
I’ve followed this rule for my entire adult life, and very rarely will I not have a pocket knife of some kind on my person. In fact, I once very nearly brought a pocket knife on a tour of the White House, and I had to run back into the hotel and return the knife to our room just as the taxi was pulling up, because I don’t think the Secret Service was going to miss it on one of the many searches they perform, and at best the knife would have been confiscated and thrown away, and more than likely I would have been answering a few questions in a room with no windows.
But, I’m not here to write about misadventures with pocket knives, but the one issue that seems to affect most pocket knife proponents, and that is sharpening. While I picked up the ability to sharpen woodworking tools relatively quickly, sharpening knives is something that I haven’t, as of yet, managed to perfect. I am pretty good, and pretty consistent, but I’m still not where I want to be. One of the issues I’ve found with sharpening pocket knives is that it can be awkward on the sharpening mediums I use on my woodworking tools, which for full disclosure’s sake are a 1000g and 8000g water stone, a Black Arkansas stone (which I don’t always use for woodworking tools), and a leather strop. Speaking only for myself, at times I struggle with using these stones to sharpen certain knives…not because I don’t know what I’m doing, and not because these items can’t sharpen a pocket knife…I seem to struggle with the ergonomics of sharpening knives on these stones.
Another issue is convenience. Water and oil stones require a “set-up” to use properly, and for the most part they certainly aren’t what I would call portable. It can be frustrating when you discover that your knife is dull, and you are at work or away from your house in some other capacity, and there is no way to put an edge on your knife. A dull pocket knife is borderline worthless, and a really awesome sharpening set up is worthless when you have no way to get to it.
So a few months ago I just so happened to catch a YouTube video for the Work Sharp Guided Field Sharpener, ironically as I was searching for a different Work Sharp product. So I found myself watching several videos on the tool both from Work Sharp and from regular YouTubers, and I was pretty impressed with what I saw. Here was a compact, light, and convenient portable pocket knife sharpening system that cost less than $40. So I ordered the sharpener and so far I’ve been very happy with it, and not just because of the convenience and portability, but also because of some of the added features, which I firmly believe have greatly improved my knife sharpening ability in a relatively short time.
Below I will post a link to my latest video on using the Work Sharp Field Sharpener, during which I compare it to sharpening knives on traditional Arkansas oil stones and discuss what I like about the tool. So if you are interested, please feel free to check it out.
*** And I should probably add that I do not work for nor am I compensated by Work Sharp in any way ***
The Heretic.
For the past few months I have been in the middle of a pseudo garage remodel. It isn’t a remodel in the strict sense, and in reality it started off as a way to add some storage while at the same time using up scrap boards that were taking up space. Like most projects, it snowballed (just a bit), and I found myself trimming out spots that I hadn’t planned on doing. Then, a shut-off valve with a slight leak failed, sprayed and leaked large amounts of water on my remaining scrap wood (and some valuable wood as well), and my project graduated to replacing copper with Pex, and using store bought wood rather than scrap.
But, a minor garage rehab isn’t really the purpose of this post, it is only the backstory which led me to this point.
When I went to the home center to pick up the rest of the wood needed to finish up the trim/storage, I purchased several 1x10x8 pine boards, some of which I used in full, and the others which I ripped into several boards. While working on these boards on the traditional workbench I found the experience to be miserable. This misery wasn’t the result of the construction of my workbench, which is just fine, but where the bench is located, which is up against the back wall of the garage. During this stretch of two or three weekends, I fully noticed for the first time in the 13 years since I constructed a traditional workbench that placing this bench up against a wall reduces its functionality by at least half, and perhaps more depending upon exactly what type of work is being performed. Had I been able to move the bench to the center of the garage it would have helped a great deal, but this was out of the question.
As I mentioned, I constructed my bench thirteen years ago, and though there have been a few changes here and there, it is still essentially the same bench now as it was the day that I finished it. The bench base is made from (8) 2x6x8 fir boards (leg assemblies), (3) 2x4x8 fir boards (for the bottom shelf), and (1) 2x10x8 fir board used for the cross stretchers. The bench top is made from (4) 1x24x72 edge glue pine panels. With this in mind, a reasonable guess of the weight of the basic bench can be made: approximately 220lbs-230lbs. This of course does not include the weight of the vise hardware or chop, or all of the stuff that is sitting on the bottom shelf, which pushes the bench over the 300lb mark. This pretty much makes moving the bench around the garage extremely difficult at best.
As I have already exhausted every other possibility of placing my traditional workbench in an optimal spot in the garage while also keeping the garage as a functional place to park a car, I decided that I was going to purchase a portable workbench, in the case a WORX Pegasus folding worktable and sawhorse. Before I go on, this post is not a commercial for the WORX corporation, or whatever the name of the parent corporation happens to be. I don’t receive compensation from WORX to hawk their products and quite frankly I don’t care if anyone reading this purchases anything from them. That being said, I like the product, a lot, otherwise I wouldn’t be writing this post, and because I am not selling anything and therefore there are no conflicts of interest, I would have no problem if WORX sent me an email and said: Thanks for saying nice things! Here is a free bench!!
And, for the record, this is hardly the first portable workbench I have owned or used. I had a Black and Decker Workmate for years…I have several foldable saw horses, etc. This was no epiphany in the sense that I discovered something new…..but I did come to a new realization…
Firstly, I was very, very pleasantly surprised by the overall sturdiness of the WORX product. It was solid, meaning I could sit on it, shove it, and pound on it and it didn’t move. But the most pleasant aspect was setting up the bench in the middle of my garage and having access to all four sides of whatever I was working on, which in one case was a 1×10, and in another case was a piece of copper pipe that I was foolishly trying to repair (hence the use of Pex). Regardless, working in the middle of the garage floor, I no longer felt confined. At one point, I had to saw several boards to length, so I broke out the powered miter saw, clamped it easily to the portable bench…and then something else dawned on me: It was a nice day outside!! Why do this in the garage when I can easily carry the portable bench onto the lawn and make the cuts there? No mess, and I get some fresh air!! Win win! It was at this point when I had my first real “Aha!” moment.
Because several of the boards were ripped on the table saw, I wanted to plane the saw marks from the edges, so I simply clamped the boards perpendicular to the portable bench…which is simple to do with the included clamping set up…and planed off the saw marks…and it worked beautifully. There was no rocking, or shifting, or what have you. For years, the prevailing wisdom has been that a very heavy bench is needed in order to saw and plane. On the 35lb portable bench I had no issues sawing or edge planing. I even used a moulding plane on a board…just to try it…and it worked fine. To continue the experiments, I clamped a router table to the bench, though I haven’t used it in a decade, and it worked just fine. I used a traditional bench hook on it…worked just fine. More importantly, I was doing all of this outside because the portable aspect of the bench enabled me to work, within reason, wherever I wanted to work.
Here’s another point…this thing is set up to be modular. I can easily put two of these benches together and create a 2ft x 5ft worktop that will compact into the space of a folding metal chair when I’m done using it, and I’m still in at under $300 in cost. Or, I can put three of these things together and have a full size workbench that with a few minor modifications will function basically as well as a traditional workbench in most aspects….and I can work in the middle of my garage, or my driveway, or on the lawn…and fold it all up and put it away when I’m finished working…and I’m only out $420…and I don’t have to purchase them all at once if I don’t want to..
A portable bench doesn’t just allow us to work where we want to work, it is also better suited to the other projects that a homeowner might encounter: plumbing projects, painting, grinding, staining, oiling and lubing…stuff that most woodworkers try to avoid doing on their traditional bench if possible. I need to clamp and stain a board and I don’t want the fumes in my garage…or maybe I want to spray paint an old toolbox….this bench does the job.
Most importantly to those of us who still enjoy certain traditional aspects of woodworking, this bench allows for such work. Hand sawing, hand planing, chopping, etc, can all be performed on this bench. The bench can also be easily modified with a basic plywood top if such a thing is concerning…a top that can be removed and easily stored with the folded up bench.
I’m sure that this all sounds like heresy to some folks out there who live and die by their traditional tools, and workbenches, and workshops. I’m not attempting to reach those people. I’m talking to those homeowners and/or woodworkers out there with a garage that is used as a garage, or those with a tiny basement, or a spare bedroom, or perhaps not even those options. This WORX portable bench is a viable option, and I am sure there are other products out there that will work as well, because this isn’t meant to be a commercial for one particular product, but a challenge to a prevailing idea that for many is not a viable option.
Once again, I’m not going to get into all of the features of this product because this isn’t meant to be a commercial or even a review. I am saying that after 13 years of being a home woodworker, and not having a real workshop, I have come to the conclusion that a traditional workbench, for many people in the same situation that I am in, is a complete waste of space. Don’t misunderstand me, I love my workbench and I am proud of it. I’m not disparaging traditional woodworking benches, I am saying that for the home woodworker without a dedicated workshop, there are many better options out there than a giant, heavy table that takes up a lot of space and can cost a lot of time and money to construct.
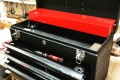
Another toolbox restoration.
Over the past weekend I was able to finish up another tool box cleanup/restoration, this one also having been one of my stepfather’s. I was able to get a bit of the history of the box, as my mom was the person who purchased it as a birthday gift for back in November of 2002. To say that it presented a challenge might be an understatement. Physically, the box was not in horrible shape. The hinge was a touch askew, a few of the drawer slides were bent, and there were dents on the lid and on the base, but those weren’t the real issues.
When I first brought the box home I was surprised at how heavy it was, even when emptied out. The sheet metal is of a much heavier gauge than I first thought, in particular with the drawers being very beefy. The box was very dirty, as in coated with a film of grime and dust held on with a coating of machine oil. It was also covered in stickers (please don’t put stickers on your tool box…use magnetic stuff instead) This layer of grime was a problem, because it hid a troublesome layer of rust and made the rest of the box look otherwise deceivingly healthy.
The first thing I did after taking the box apart was vacuuming out any of the dirt that I could, Then the box got a bath with Dawn and a scrub brush, which at the least made me feel better about handling it without getting goo all over my clothes. I then removed the drawers and decorative drawer pull covers, scrubbing them down with Dawn as well. Thankfully, the drawers were mostly in good condition, with only a bit of surface rust in two of the smaller top drawers and the corner of the bottom drawer. But, like many things in life, bringing the box out into the light of day coupled with a thorough cleaning revealed the true nature of the beast, namely a layer of very heavy rust on the toolbox bottom.
I was able to knock out the dent at the bottom easily enough with a rubber mallet (the one on the lid was a bit more of a challenge) , but the rust was so bad that I very nearly decided against attempting the restoration, and if the gauge of the steel had been lighter it probably wouldn’t have been fixable. But, because the box belonged to my step dad, I soldiered on. Just like the smaller box I restored, I soaked this one in rust remover and in WD40 for several days, then came the long, arduous task of grinding and sanding away the rust so it could be painted. (There are more details in the video pasted below).
The box when I first brought it home. There was makeshift clasp attached to the upper left corner that I removed before the photo was taken (hence the holes)
The bottom of the tool box after nearly 2 days of soaking and several hours of grinding and sanding.
A look at the front of the box with the drawers and some of the stickers removed. There is a small hole visible under the lock that was covered by a sticker..not sure why or how the hole got there…

The box after some initial cleaning, grinding, and sanding. Some of the holes are filled in with the first application of epoxy.
The first coat of paint applied. After this coat I applied a bit more epoxy to better fill in the screw holes.
The finished tool box. 3 coats of paint, holes filled, drawer pulls polished.
There was unfortunately no magical transition, and Cinderella didn’t just turn into a princess with the snap of a finger….it just took a lot, and I mean a lot of elbow grease. Removing the stickers and residue was particularly grueling…once again…don’t put stickers on anything…they eventually wear out end up looking like hell. The drawer fronts were painted with a gloss black spray paint/primer combo, which I used because it was handy. But the rest of the box I painted with a Rust-Oleum paint/primer in the Hammered Black color, which I was very pleasantly surprised with. I chose Hammered Black because on the can it was advertised that it would mask slight imperfections, and I must say it did a pretty good job in that regard.
There are many details that I am leaving out that are made more clear in the video (that I hope you might watch). As of writing the post I am still in the process of lining the drawers. I was also able to purchase replacement keys from eBay for the box. Though I applied three coats of paint, I will also be on the lookout for any required touch ups, as there is always something that gets missed. But, all of the drawers work…the lock and release latches are functioning…the rust is all gone and there are no glaring dents or dings…the lid opens and closes much more smoothly…if anything else it is a functioning toolbox again that should last another 20 years.
The bottom line is that this box probably wasn’t as well cared-for as it could have been, but I am glad that I took the trouble, and it was trouble, to get it cleaned up and looking half-decent again. That being said, if I came across another box in the same condition I very likely wouldn’t touch it. We learn from experience…
No ratchet is going to beat me.
For the last month or so I’ve been going through my step-dad’s tool boxes, mainly sorting, cleaning, repairing, and donating tools as the situation warrants. A few weeks back I finished up the “restoration” of a tool box that was in a bit rougher shape than I had initially believed. Now, I am in the process of clearing out another box, this one quite a bit larger, and hopefully I will be able to restore it to the same level as the last one, which I can happily say turned out well. The experience has been somewhat bittersweet, as several times I came across things that instantly evoked some very strong emotions.
But, this post isn’t really about tool archaeology, as interesting as an experience as it has been for me. Among the many tools that I’ve come across, there have been several Craftsman ratchets in very good condition, but all in need of lubrication. Last week I took one apart, which doesn’t take long if you’ve never attempted it, and found it to be bone dry. I greased the gears, but struggled a bit with getting the ball bearing to stay in place while reinserting the reversing mechanism. It turns out that installing the lever back into the gear while maintaining downward pressure on the ball bearing is a little easier said than done. Rather than struggle with the rest, I found a tool-sold online-used by Sears employees back in the day, that makes holding down the ball bearing much more manageable.
Below is a video of my first attempt at reassembly with the new tool. Unfortunately I did not film the reinsertion of the reversing gear, and I should have, but I was worried that it would take longer than would be worth watching.. Thankfully it went fairly well. I also show some more tools that I came across as well as some older electrical slide charts that I used when I first became an electrician. If you care to watch the video, please do, and I hope you enjoy it.
An Ode to a Metal Tool Box
Well over a decade ago, when I decided to purchase a few tools and try to make furniture, I soon discovered that metal tool boxes were persona non grata in the world of woodworking. If you didn’t have, or if you weren’t planning to make a wood tool box or tool chest for your tools, then you were considered little more than a poseur whose attitude would eventually destroy “the craft”. Why metal tool boxes don’t get love in the world of woodworking is a bit of a mystery to me, as in many ways they are superior to wooden tool boxes in cost, in protection offered, and in longevity. Perhaps wooden tool boxes are a vestige of the days when making a toolbox was a key aspect of a woodworking apprenticeship. Either way, I’ve decided to make an attempt to elevate metal tool boxes a bit above their third-class citizen status with my own Ode to a Metal Tool Box (with apologies to George Graham Vest):
“The best friend a woodworker has in this world may turn against him and become his enemy. His son or daughter that he has reared with loving care may prove ungrateful. Those who are nearest and dearest to us, those whom we trust with our happiness and our good name, may become traitors to their faith. The money that a woodworker has, he may lose. It flies away from him, perhaps when he needs it the most. A woodworker’s reputation may be sacrificed in a moment of ill-considered action. The people who are prone to fall on their knees to do us honor when success is with us may be the first to throw the stone of malice when failure settles its cloud upon our heads. The one absolutely unselfish friend that a woodworker can have in this selfish world, the one that never deserts him and the one that never proves ungrateful or treacherous is his metal tool box.
A woodworker’s metal tool box stands by him in prosperity and in poverty, in health and in sickness. His metal tool box will sit on the cold ground, where the wintry winds blow and the snow drives fiercely, if only it may be near his master’s side. A woodworker’s metal tool box will fit snugly in the hand that has no work to offer, it will carry the bandages and ointments that cure the wounds and sores that come in encounters with the roughness of the world. A metal tool box guards the tools of his pauper master as if he were a prince. When all other friends desert, his metal tool box remains. When riches take wings and reputation falls to pieces, his metal tool box is as constant as the sun in its journey through the heavens.
If fortune drives the woodworker forth an outcast in the world, friendless and homeless, the faithful metal tool box asks no higher privilege than that of accompanying him to guard his tools against danger, to fight against tool rust, and when the last scene of all comes, and death takes the woodworker in its embrace and his body is laid away in the cold ground, no matter if all other friends pursue their way, there will the noble metal tool box still be found, its tools between the dividers, its lid sad but open in alert readiness, faithful and true even to death.”
WL-2023
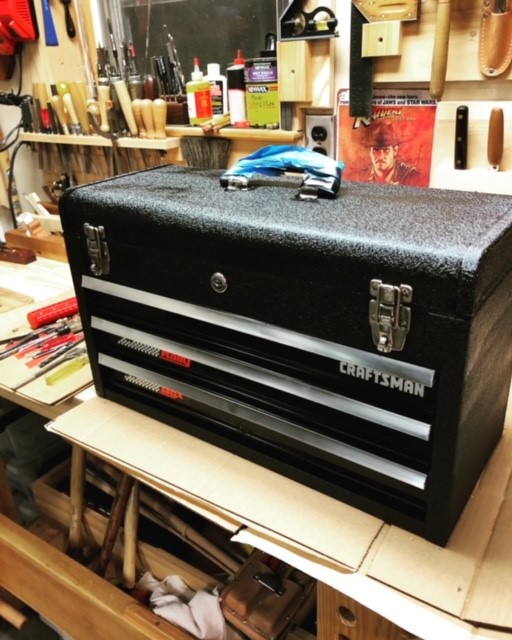
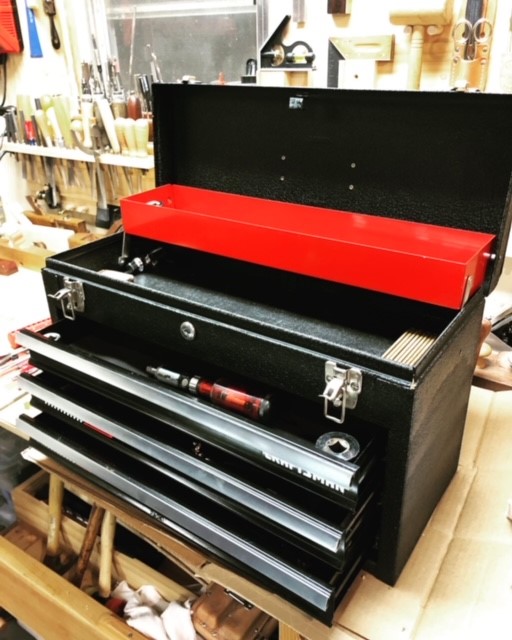
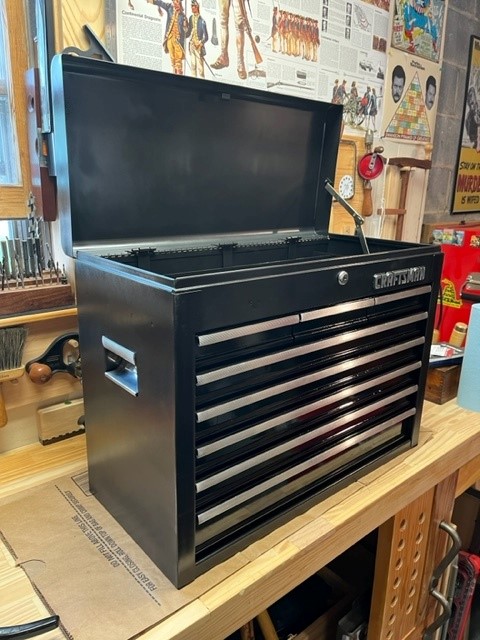
Family heirloom
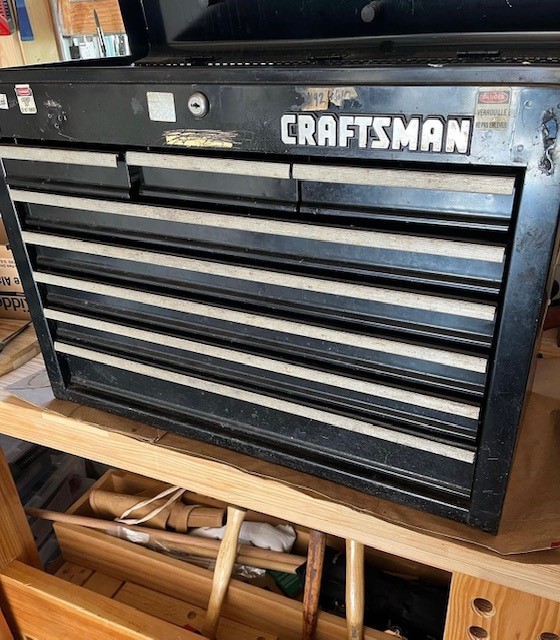
When my stepdad passed away last year, among the things he left was a very large collection of tools. Most of these tools are mechanics tools, and many of them are specialized to his trade, which was a packaging machine mechanic. Unfortunately, I personally cannot use many of those tools, but we have been able to get some of them to those who can use them. In the meanwhile, my mom has been asking me to go through several of the toolchests that he left, and last weekend I began the process.
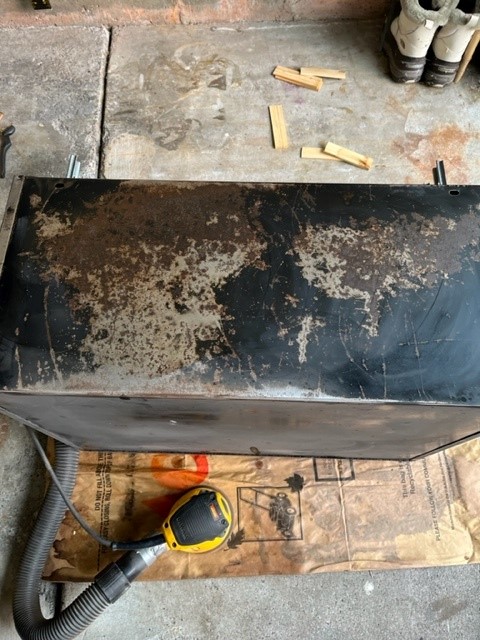
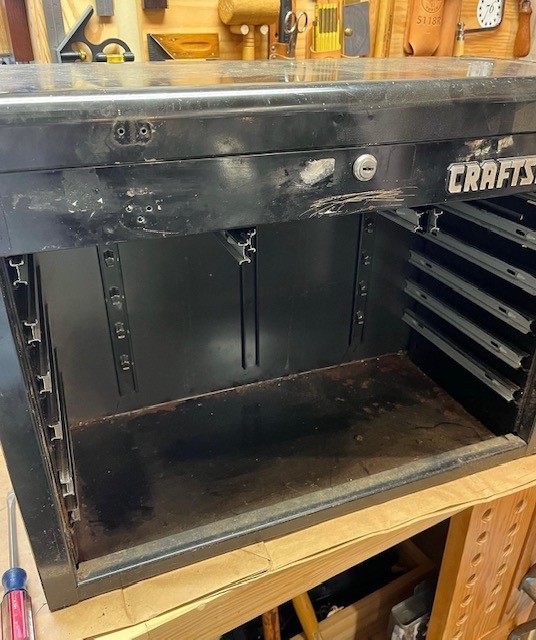
Initially my plan was to just bring the chests home and go through them at my leisure, however both are too large for me to move. But, I noticed a smaller ‘Craftsman’ three-drawer toolbox sitting in a dark corner, so I brought it home and went through it on camera. More than half of the tools in the box were things I just couldn’t use, but I was able to get most them to those who could (after I cleaned them of course). The other tools I kept. The box itself was quite dirty, and afterwards when I gave it a cleaning I found a fairly significant amount of rust. But rust wasn’t the only issue.
When I brought the box home, the top drawer was askew, and the top would not fully open. I discovered that the latching mechanism, which activates when the lid opens and closes, and keeps the drawers in place when the box is shut, was wedged into the top drawer. Thankfully, I was able to remove the drawer and free up the mechanism, giving me access to all of the tools. I was able to straighten out the drawer with a mallet fairly easily, but one thing led to another, and as with many repairs, each “fix” exposed fresh new issues, and what was supposed to be a quick toolbox clean up turned into a virtual complete restoration.
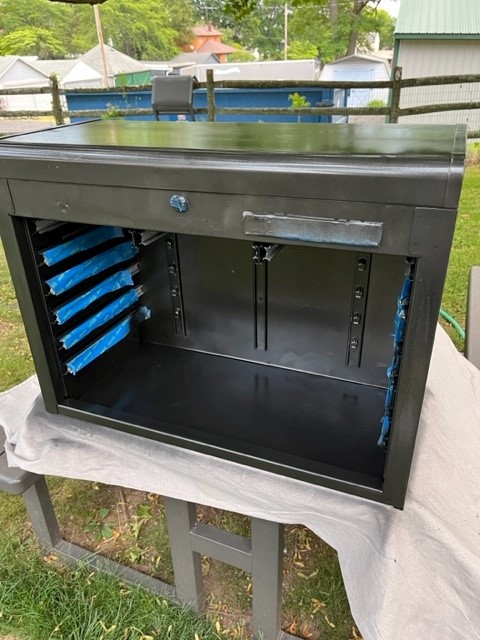
Below I posted some photos of the finished product and the latest video in a series of fairly short videos that I made detailing the contents of the box and the efforts that were made to clean it up and get it working like new again. What isn’t on the videos happened just yesterday, as I decided to do a bit more work, mainly painting one of the drawers that was dinged up. I was also able to get the serial number from the box and I discovered that its manufacture date was 1994, which roughly corresponds to a guess that I made on camera. Otherwise, if you do happen to watch the videos I hope that you find them enjoyable.