Home » book case
Category Archives: book case
I’m often inspired by curtains.

Sometimes we build things because we are inspired by something we saw. Sometimes we build things because we feel the need to build. And sometimes we build things out of necessity. My latest project was born out of necessity.
I have been on a reading kick lately that has not been rivaled since I was a young boy. Subsequently, my book collection, which was already quite large, has grown to the point that it can no longer be contained. The closet in our spare bedroom/home office has become the latest storage area, and the shelf system I built for it has become an ersatz extension of my library, with two and a half of the five shelves containing spill over books. Last week I decided that enough was enough, and something had to be done, and oddly enough, it was the curtains I use to conceal the contents of the closet that served as an inspiration in the construction of a small bookshelf.
Quite a few years ago I made a shelf system for the spare bedroom closet that took up approximately 1/3rd of the total closet width, with the rest having a typical closet rod for clothes. Those shelves were supposed to hold items such as spare silverware and linens, but my books slowly crept in, like locusts, until they took up half of the shelf space. Originally the closet had two, cheap sliding doors, which I removed not long after we moved into the house. Because the geniuses who framed our house framed the closet openings to finish size without taking into account the trim boards, it is impossible to find off-the-shelf closet doors that will fit into the opening. For one of the other bedroom closets I actually purchased closet doors and trimmed them to fit, which literally took days, partly because my skill as a trim carpenter is average at best, and partly because trimming 2 inches around from bifold doors involves re-routing hinges, and re-setting dowels etc. which is a lot more difficult than it sounds. Regardless, the closet in the spare bedroom has two curtains which when closed look like a bookshelf; I really like the look. So as strange is this may seem, I based my little bookshelf off of the print on the curtains.
The bookshelf print on the curtains isn’t really overly unique, but the shelves have a shallow groove routed into the front that I decided to mimic. I wanted the bookshelf to be 34 inches tall and 15 inches wide so that it would be the same height as the top of my campaign desk and fit next to it snugly. Most importantly, I wanted this to be a quick project, something I could build and finish in a few days time. Now, for the sake of full disclosure I will freely admit that I initially attempted to buy a bookshelf that would fit in the space I had set aside, but I couldn’t find one that I liked, or at least I couldn’t find one that I liked and that would fit into the area where I needed it to fit. So a few days before Independence Day I picked up (2) 1 x 12 x 72in pine boards from the home center along with a 4×4 sheet of 1/4 inch plywood along with a small container of Minwax walnut stain. Total cost, including tax, was around $90.00. The Monday after Independence Day was a work holiday for me, so that was when the bulk of the construction was completed.
The case has three shelves, dadoed into the case sides, with the top shelf open and shallower than the others, which I may use to display a portrait or some other decorative items. I glued and nailed trim at the top of the case to hide the end grain, and the plywood for the back was nailed into a rabbet. And to stiffen up the case even more so I also nailed the plywood backer into the shelves. But the only aspect of the construction I would like to mention in any real detail is the use of pocket holes joinery
I’ve used pocket hole joinery here and there, mainly to make the occasional face frame. Unlike some woodworkers, I have nothing against using pocket holes/screws. Some view it as blasphemy, in particular the keyboard warriors on the internet forums (if you ever want to be lectured on Japanese hand planes by an accountant from Ohio then internet woodworking forums are the place for you) But as far as I’m concerned, do whatever works for you. However, I guess I am something of a snob, too, because I shied away from pocket screws as well. The one place I do often use them are as clamps for glue ups; the pan heads on the screws do a nice job in that task. And, they work well for repairs, as it is easy to drill out a pocket in an inconspicuous place to add a mechanical fastener along with the glue joint.
With that all being said, on this project I used pocket screws to add two “stops”, for lack of a better word, at the back of the two interior shelves. Because the back of the bookcase is just 1/4 inch plywood held with finish nails, I wanted something to keep the books from pushing against it. So I cut two cleats, added a chamfer to each, and used pocket screws to fasten them to the case sides. Not only will the stops protect the plywood backer, I believe they also add to the overall appearance and strength of the bookshelf. I then used pocket screws to attach the backer of the top shelf, which was initially just a friction fit in a shallow dado. I had planned on nailing it from the outside, instead I used pocket hole joinery, which was then hidden by the plywood backer.
Today I gave the case an overall light sanding and planed down anything that was protruding, also adding light chamfering on all of the corners. I then applied the walnut finish and one coat of Sam Maloof poly/oil blend, tomorrow I will apply a second coat and call it done. Though the instructions on the can recommend three coats, I don’t want the case to be too shiny, and two coats are plenty for where this bookcase is being placed.
Overall I enjoyed this project. Building a “down and dirty” bookcase on my day off wasn’t necessarily what I had in mind, but in the end it was worth it. One of the nice things about having a few tools and some basic furniture making skills is being able to quickly make a bookshelf that looks half-decent and fits where it needs to fit. Less than $100 and a few hours of my time and I was able to fill a need. And of all things, it was a printed pair of curtains that gave me the kick I needed to get it done.


The bravery test.
I can say without shame that I am not a furniture designer. I know that I’ve written before about how I rarely follow woodworking plans, and that is true. But while most of the furniture I make I do technically design myself, I usually base it off of previous design elements. My current project is no exception.
For this project, I wanted to make a narrow, somewhat unobtrusive cabinet that would sit nicely in a corner, hold some framed pictures, possibly a few little odds and ends, maybe a trophy or medal (ahem). So I measured a few possible locations in my house, narrowed it down to two, and came up with the dimensions accordingly. And while I can’t claim to be overly concerned with proportion, I did make an attempt to make this cabinet proportional, as in the shelves are twice the case width, and the height is three times the shelf width. I’ve found that those proportions are usually pleasing. So with all of my careful planning it was only natural that something went horribly wrong.
Sunday morning I burst into my garage all ready to go. My stock was already initially prepared, my tools were sharp, and my work space clear. The first step was to make the dados to hold the shelves. I normally like adjustable shelving, but in this case (both literally and figuratively) I want all of the shelves static because it will allow me to incorporate decorative hardware into the design. I have a dado plane that I’ve restored, and that was the tool I had hoped to use, but I’ve been having trouble with the wedge, and the practice dados didn’t turn out as nicely as I would have liked, so I used a saw and chisel.
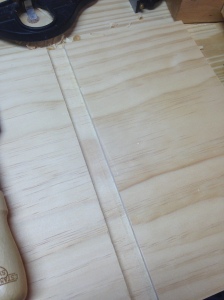
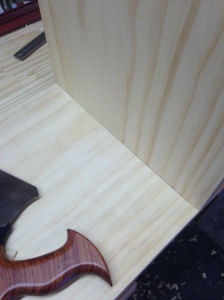
Because there are ten dados in this case, and because some family was stopping by for a visit, I knew I wouldn’t have time to do all ten, so I concentrated on the top and bottom set. To make the dados, I used a knife to define the cut, used a chisel to make a knife wall, used a carcase saw to get the depth, chopped out the waste with a chisel, and cleaned it all up with a router plane. It wasn’t fast work, but it didn’t go too slowly either, and I had the four dados finished in about an hour. To my credit, the dados turned out nicely. The fit was good, and the one real mistake I made was going to disappear when I rabbeted the case side for the back panels. But when I did the test fit something didn’t seem right.
****before I go on, I just want to say that if you are cutting your dados with hand tools and you need to mark a knife line, the only tool to use is a 12 inch combination square. I tried a square I have from Woodpeckers, as well as a try square, and both were almost useless. The combination square, with it’s “triangle” shape and thin blade is by far the most steadfast and accurate way to go about it****
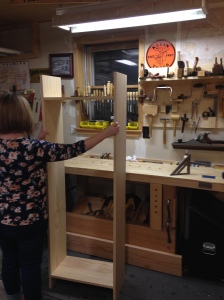
After our company left, I brought my lovely wife into the garage with me and I assembled the case. My wife held it up and I stepped back to get a proper perspective, and right away I knew the case was just too tall. I wanted this case to almost disappear into a room, and instead it was towering over my wife (to be fair she is only 5′ 1″ tall). In any event, it just didn’t look right to my eye. Of course I didn’t yet curve the case sides, or add any of the decorative trim or features which will certainly lighten the look of the case, and my wife suggested that I should possibly do that before I made any rash decisions. But I don’t think it will make much of a difference, and in doing that it may only cause me to do the same work twice. So I’ve decided that I will shorten the case by ten inches. The good news is the bottom dados are salvageable; the bad news is that the top dados are not.
Unfortunately this is going to negate most of the work I put in on Sunday, but I feel it has to be done, because I know I’ll regret it completely if I don’t. I’ve never been the person who has taken the easy way out. I’m not saying that taking the easy way out is necessarily a bad thing, because sometimes the easy way is also the best way. But in this case the easy way out is really just the lazy way out. Whatever I may be, and whatever bad qualities I may have, being lazy isn’t one of them.
The Tough Get Going
So the woodworking mafia has effectively shut down my vitriol with thinly veiled accusations and threats of blackballing. My wife, who hates me, couldn’t really care less if I look like Captain America or Captain Crunch. And, I spend more than half of my waking hours at work. Life has not been kind to the SCW lately. But when the going gets tough, the tough get going. I can still woodwork, and that is exactly what I am going to do.
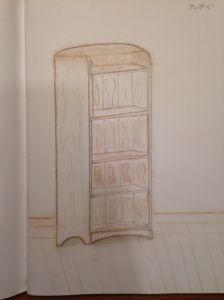
This past summer was pretty rough, and I’m not only talking about the weather, and for a while it didn’t seem like woodworking would be in the cards for the foreseeable future. But just as I was lamenting my lack of inspiration concerning possible woodworking projects, several ideas came to me at once. So for my next project I am going to make a narrow bookcase/display cabinet. I’ve always liked the look of Arts and Crafts style bookcases; I like narrow cabinets, and maybe most importantly, I have the perfect place for it. , So I researched a few common designs, combined the features that I liked, and began making some drawings and laying out basic dimensions of the case. I don’t actually plan on using the cabinet for books. A hobby of mine, which may sound strange to some people (which also drives my wife crazy), is framing and displaying historical letters and documents, such as the Gettysburg Address, the “Infamy speech”, as well as documents such as Declaration of Independence. Though I’m partial to material pertaining to George Washington and Abraham Lincoln, I don’t discriminate.
I would like the finished cabinet to be somewhere around 66 inches tall, 22 inches wide, and 11 inches deep. That should give me enough room for five shelves, with each shelf holding up to two standard sized documents, and/or a nick-knack or two. As far as material, I will likely use clear pine just for the expense (or lack of expense). However, I am going to Hearne Hardwoods next week for the Lie Nielsen hand-tool event, and if I can somehow afford it, I would love to pick up some quarter-sawn oak or possibly some walnut for this project, but considering that my budget is around $200 I don’t think that is going to happen. Still, I am going to attempt to make an accurate cut list and see what material may fall within my budget.
If I get my drawings finalized, and If everything goes according to plan, I should get this project up and running by the first weekend in October. So even if my wife hates me, and a bunch of woodworking geeks hate me, and I’m working myself to death. I don’t care anymore, because I’m going to be woodworking again, and that’s going to make it all better.


